The act of assigning ratings to individual images, footage, or files is known as "Rating." It involves the subjective assessment by the user, either in the camera or through a software application. This process serves as a means to categorize and organize media based on perceived value or importance. Integrating Rating Metadata into cameras allows videographers and filmmakers to easily identify and select the best clips for editing and post-production. This metadata provides a convenient reference for recognizing high-quality footage, thereby streamlining the video production workflow. Furthermore, Rating Metadata facilitates efficient collaboration among team members by establishing a shared understanding of the quality and relevance of different video clips. Ultimately, Rating Metadata plays a vital role in optimizing video production processes and elevating the overall output quality.
Table of Contents
Understanding Rating Metadata
Rating Metadata refers to the subjective assessment of video quality assigned to individual videos or clips captured by camera. It provides a standardized way to evaluate and categorize the perceived quality or significance of the footage. Let's explore how Rating Metadata is assigned with a real-world example:
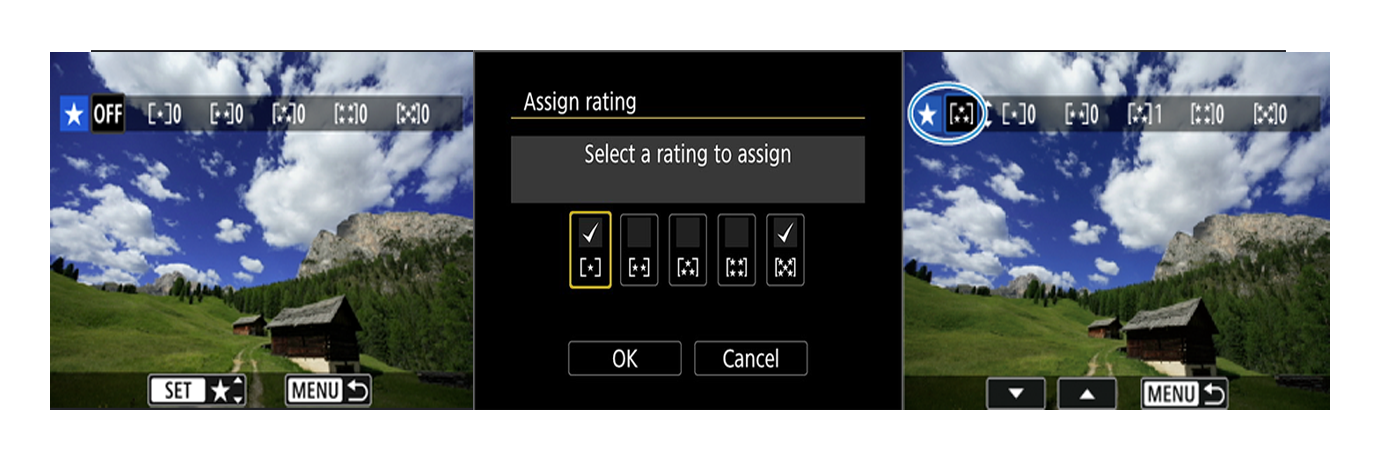
Imagine you're a videographer using a Canon camera to shoot a documentary. Throughout the filming process, you review and assess the footage based on various criteria, such as composition, lighting, focus, content relevance, and overall visual appeal. To assign Rating Metadata to the videos, you utilize the camera's built-in rating system.
For instance, let's say you're reviewing a particular clip that captures a crucial moment in the documentary, perfectly framed and well-lit. You decide that it deserves a high rating to indicate its significance. Using the camera's interface or controls, you assign a 4-star rating to this clip.
On the other hand, while reviewing another clip, you notice that it has issues with focus and exposure. Despite the content being valuable, the technical quality is not up to par. In this case, you assign a lower rating, perhaps 2 stars, to indicate its relatively lower quality.
By assigning Rating Metadata to each clip during the shooting or reviewing process, you create a standardized system for assessing the video quality. These ratings can then be utilized during the post-production stage when selecting the best clips for editing or assembling the final documentary.
In this example, Rating Metadata plays a vital role in identifying and prioritizing footage based on its perceived quality. It helps streamline the editing process by highlighting the clips that meet the desired criteria, ensuring that the final product maintains a high standard of visual excellence.
The Importance of Rating Metadata in Video Production
Rating Metadata has a significant impact on collaboration, decision-making, and project management within the context of video production. Let's explore the real-world example of a team working on a commercial advertising project:
In this scenario, the team consists of a videographer, editor, and creative director. They are responsible for capturing footage, selecting the best shots, and creating a compelling advertisement. Rating Metadata plays a crucial role in facilitating their collaboration, decision-making, and project management processes.
- Collaboration:
The team members can easily communicate and collaborate by referring to the assigned Rating Metadata. For example, the videographer can review the footage and assign ratings based on visual appeal and relevance. When sharing the footage with the editor and creative director, they can quickly identify the clips with higher ratings, indicating the most visually striking and compelling shots. This streamlined communication helps the team focus on the best content, leading to more efficient collaboration. - Decision-Making:
During the editing process, the editor can refer to the Rating Metadata to make informed decisions about which clips to include in the final advertisement. Higher-rated clips are more likely to be considered for prominent placement, ensuring the overall quality and impact of the advertisement. By relying on the assigned ratings, the editor can make decisions confidently and efficiently, reducing the time and effort spent on reviewing and comparing clips. - Project Management:
Rating Metadata aids in project management by providing a standardized system to prioritize tasks and allocate resources. For instance, the creative director can easily identify the top-rated clips and allocate additional time and resources to polish and enhance those segments. This helps optimize the workflow and ensures that the most visually captivating content receives the necessary attention and resources, leading to a higher-quality end product.
Overall, Rating Metadata fosters effective collaboration, streamlines decision-making processes, and enhances project management in video production. By leveraging the assigned ratings, teams can align their efforts, make informed choices, and efficiently manage resources, ultimately contributing to the successful completion of projects with outstanding visual quality.
The Role of evrDVR and evrExpanse
evrDVR and evrExpanse play essential roles in effectively managing and leveraging Rating Metadata, providing valuable tools for videographers and filmmakers. Here's how they contribute:
- Metadata Extraction: evrDVR is designed to extract camera Rating Metadata and other essential metadata from supported camera models, such as Canon EOS and Panasonic cameras. This includes subjective video quality assessments assigned to each clip.
- Metadata Export: It allows users to export camera Rating Metadata, along with other relevant metadata, in a standardized format. This facilitates seamless integration with DaVinci Resolve® enabling efficient video editing workflows.
- Enhanced Workflow Efficiency: By incorporating camera Rating Metadata into the exported metadata package, evrDVR empowers users to access and utilize subjective video quality assessments during the editing and post-production stages. This streamlines the selection and curation of clips, enhancing overall workflow efficiency.
- Metadata Management: evrExpanse enhances the capabilities of evrDVR by incorporating Metadata Export integration with other Non-Linear Editing (NLE) software. This integration allows users to seamlessly export Rating Metadata, along with other relevant metadata, to be used in a wide range of NLEs. It provides robust metadata management capabilities, including the handling of Rating Metadata. It allows users to extract, manage, and retain Rating Metadata during the transcoding and management of master files.
- Transcoded Metadata Embedding: During the transcoding process, evrExpanse ensures that Rating Metadata, including subjective video quality assessments, is retained and embedded in the transcoded files. This enables seamless compatibility with various NLEs and downstream workflows, preserving the original metadata.
- Expanded NLE Integration: evrExpanse supports integration with a range of NLE software, including Final Cut Pro®, DaVinci Resolve®, Assimilate SCRATCH®, Avid Media Composer®, Pomfort Silverstack®. This enables users to leverage Rating Metadata within their preferred editing environments.
Together, evrDVR and evrExpanse provide comprehensive solutions for managing and leveraging Rating Metadata. They enable users to efficiently work with subjective video quality assessments, enhancing the video production workflow, facilitating collaboration, and ensuring the integrity of Rating Metadata throughout the entire process.
Efficient Metadata Import and Smart Bin Organization in DaVinci Resolve with evrDVR
To import a CSV file and populate your clips with metadata in DaVinci Resolve, follow these steps:
- Open your project in DaVinci Resolve and make sure the Media Pool is visible. If it's not, click on the Media Pool tab to display it.
- Optionally, select the clips in the Media Pool to which you want to import metadata.
- Go to the "File" menu and choose "Import Metadata To," then select "Media Pool." This option allows you to import metadata to every clip in the Media Pool.
- In the Import Metadata dialog box, locate and choose the CSV file containing the metadata you want to import, and click "Open."
- In the Metadata Import dialog box, uncheck the "Match using clip start and end Timecode" option, as this information is not present in the imported metadata. Optionally, check the "Match using source file paths" if you want to match metadata based on file paths.
- Choose one of the following Merge Options in the Metadata Import dialog box:
- "Only update metadata items with entries in the source file" (recommended): This option only updates a clip's metadata if there is a valid entry in the imported CSV file. Other metadata fields remain unchanged.
- "Update all metadata fields available in the source file": This option overwrites every metadata field referenced in the CSV file, regardless of whether there's a valid entry for that field.
- "Update all metadata fields available in the source file and clear others": This option overwrites every metadata field referenced in the CSV file and clears any metadata fields not referenced.
- Once you have chosen the desired Merge Option, click "OK" to import the metadata. All available metadata from the CSV file will be imported and applied to the corresponding clips.
After importing the CSV file with the media metadata into DaVinci Resolve, you will find all the imported metadata displayed in the Metadata panel on the right side of the DaVinci window, just as you would expect.
To create Smart Bins based on the Rating Metadata, follow these steps:
- Create a new Smart Bin.
- Add (Metadata - Camera > Camera Notes - contains - ) + (Metadata - Camera > Camera Notes - does not contain - ) to include only files with a one-star rating in the Smart Bin.
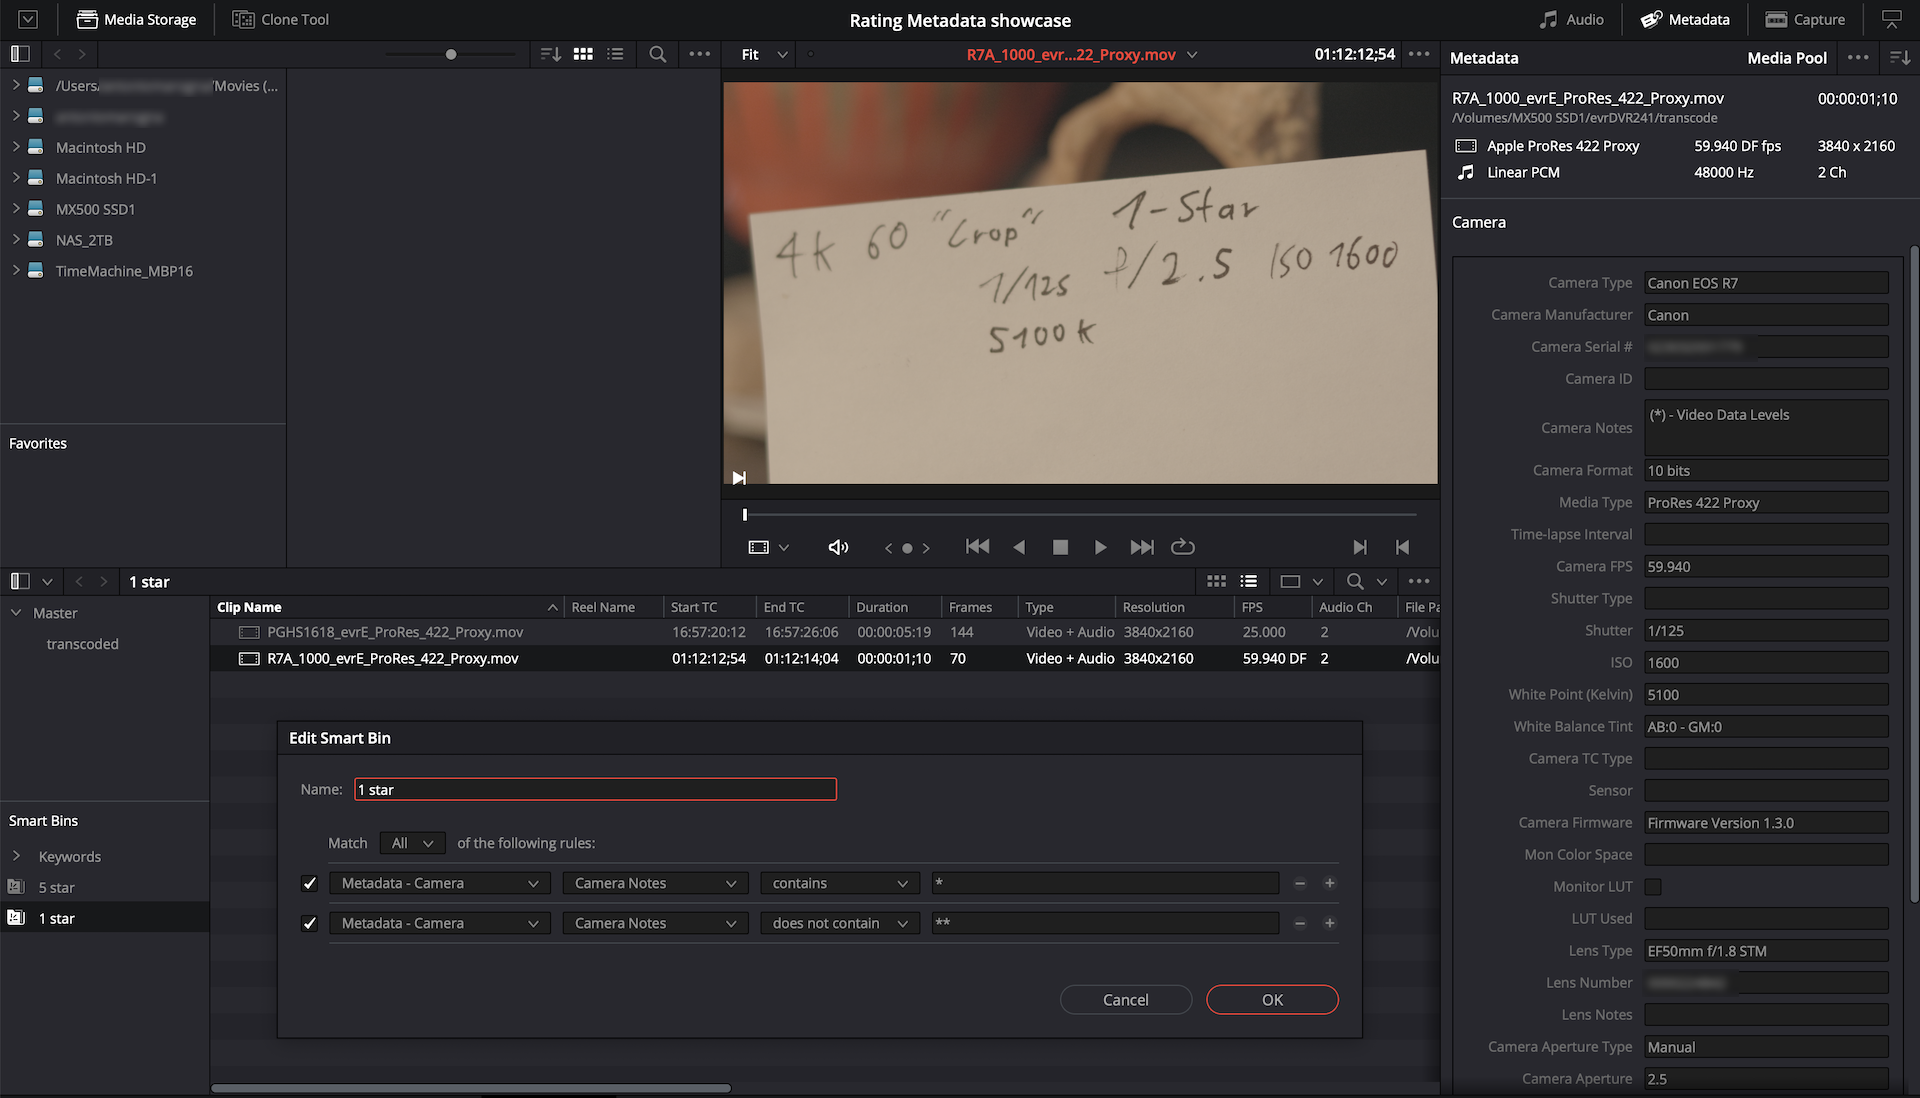
Similarly, if you want to create a Smart Bin for five-star rating files, add (Metadata - Camera > Camera Notes - contains - ). You can continue this pattern for other star ratings by adjusting the rule accordingly.
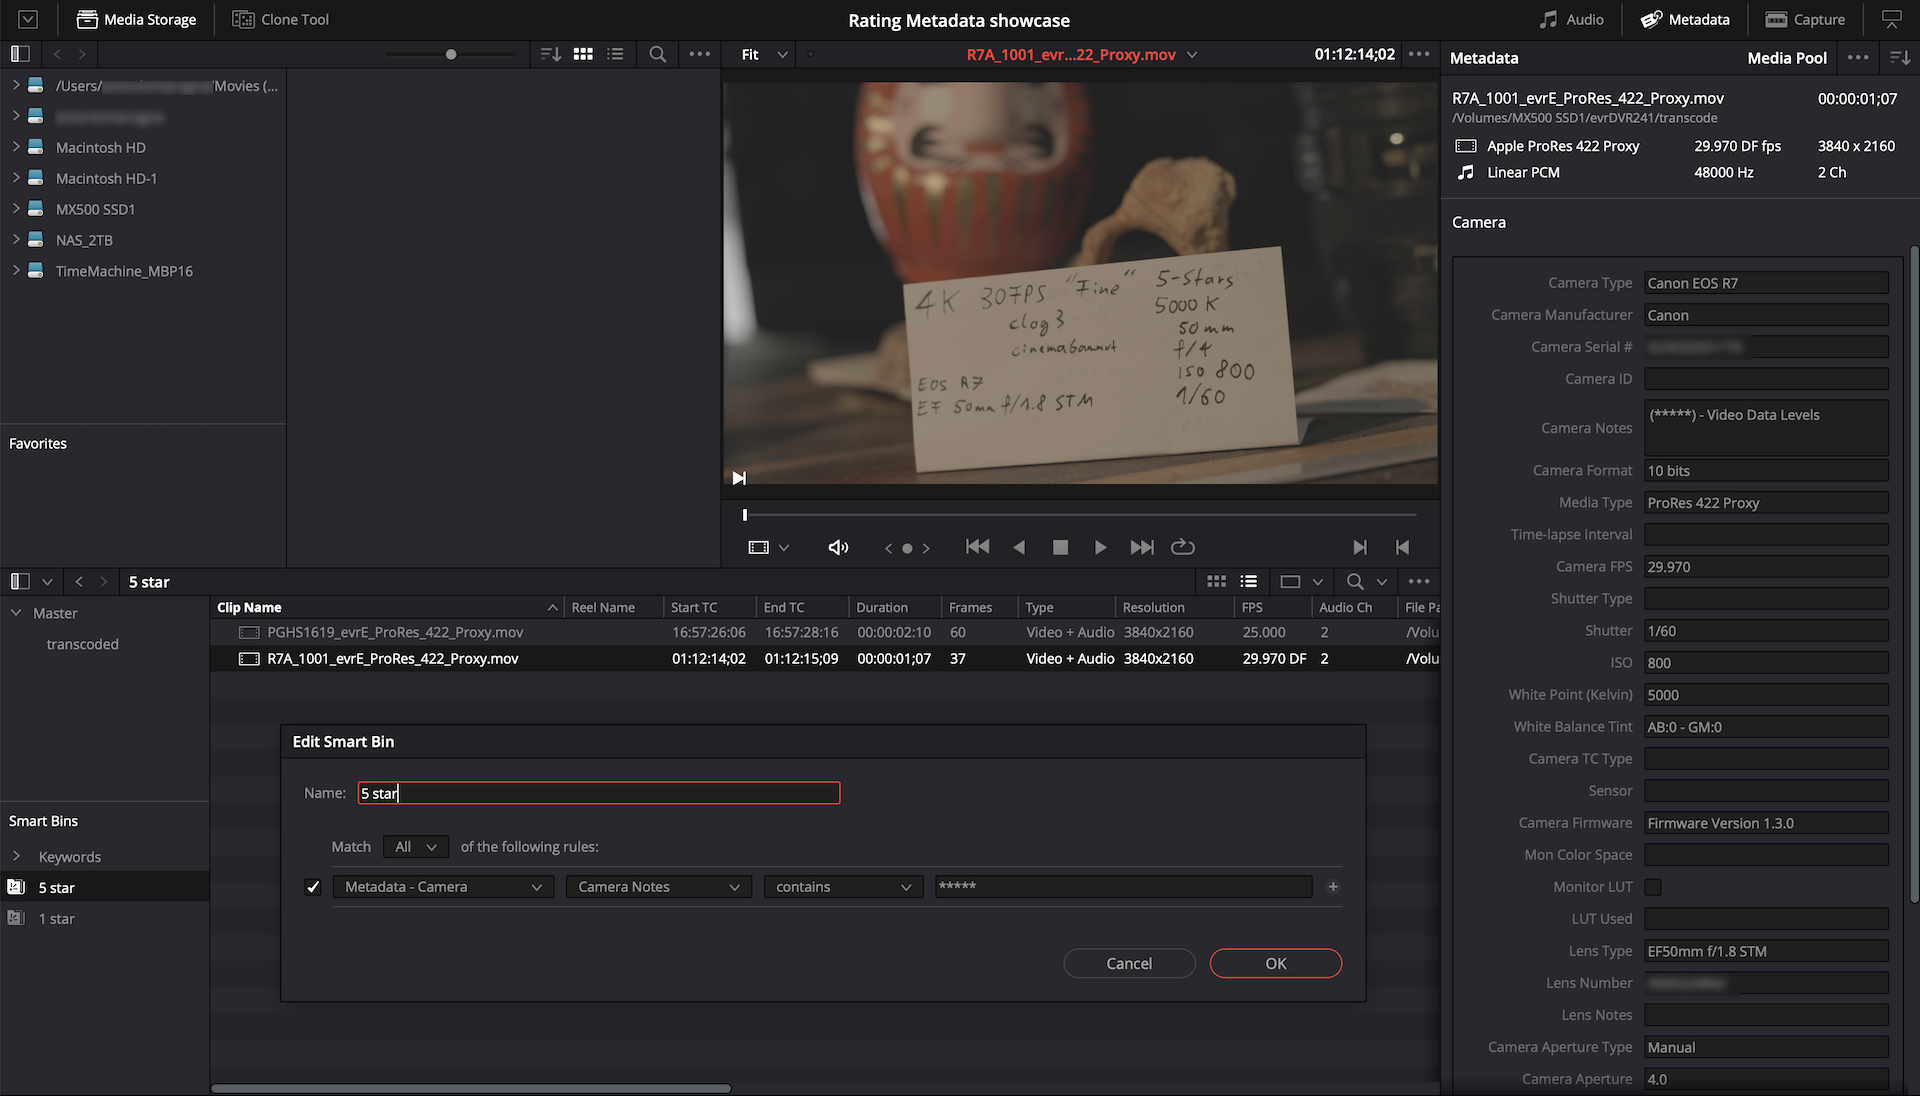
Customize Smart Bins according to your preferences by specifying the appropriate rule.
By creating Smart Bins with the desired rules, you can organize your media based on specific star ratings easily.
Streamlining Metadata Export and Smart Collection Organization in Final Cut Pro with evrExpanse
By utilizing evrExpanse, you can explore numerous possibilities, including the ability to export the same CSV file mentioned earlier with evrDVR. Moreover, all supported metadata, including the Rating Metadata, can be exported for other non-linear editing systems (NLEs).
For instance, in Final Cut Pro (FCP), if you wish to import media files and metadata, simply double-click on the exported FCPXML or FCPXMLD file. FCP will automatically prompt you to select the Library where you want to import the media files. After the import process, a new Event will be created with the name of the processed folder that contains the processed files. All the imported metadata will be visible in the Info Inspector on the right side of the FCP window.
Moreover, Final Cut Pro features a built-in property called "Notes" that will be filled with the Rating Metadata of each media file upon importing the XML file generated by evrExpanse. This allows for easy and efficient sorting within each Event. This redundancy proves to be convenient because the Rating Metadata is also stored in the Camera Notes Metadata of each file. As a result, you have multiple ways to access and organize the rating information, providing flexibility and convenience in managing your media files.

To further organize your media based on the Rating Metadata, follow these simple steps:
- Open Final Cut Pro on your computer.
- In the Libraries sidebar, select the library where contains the imported Event.
- Click on the "Smart Collections" tab at the top of the Libraries sidebar.
- Right-click (or control-click) anywhere in the Smart Collections area and select "New Smart Collection" from the context menu. Alternatively, you can go to the File menu and choose "New Smart Collection."
- A dialog box will appear where you can specify the criteria for your Smart Collection.
- Give your Smart Collection a name in the "Name" field. For example, 1 Star, 5 Star, etc.
- Define the criteria for your Smart Collection using the available options such as keywords, ratings, markers, media type, and more. You can add multiple criteria to refine your Smart Collection.
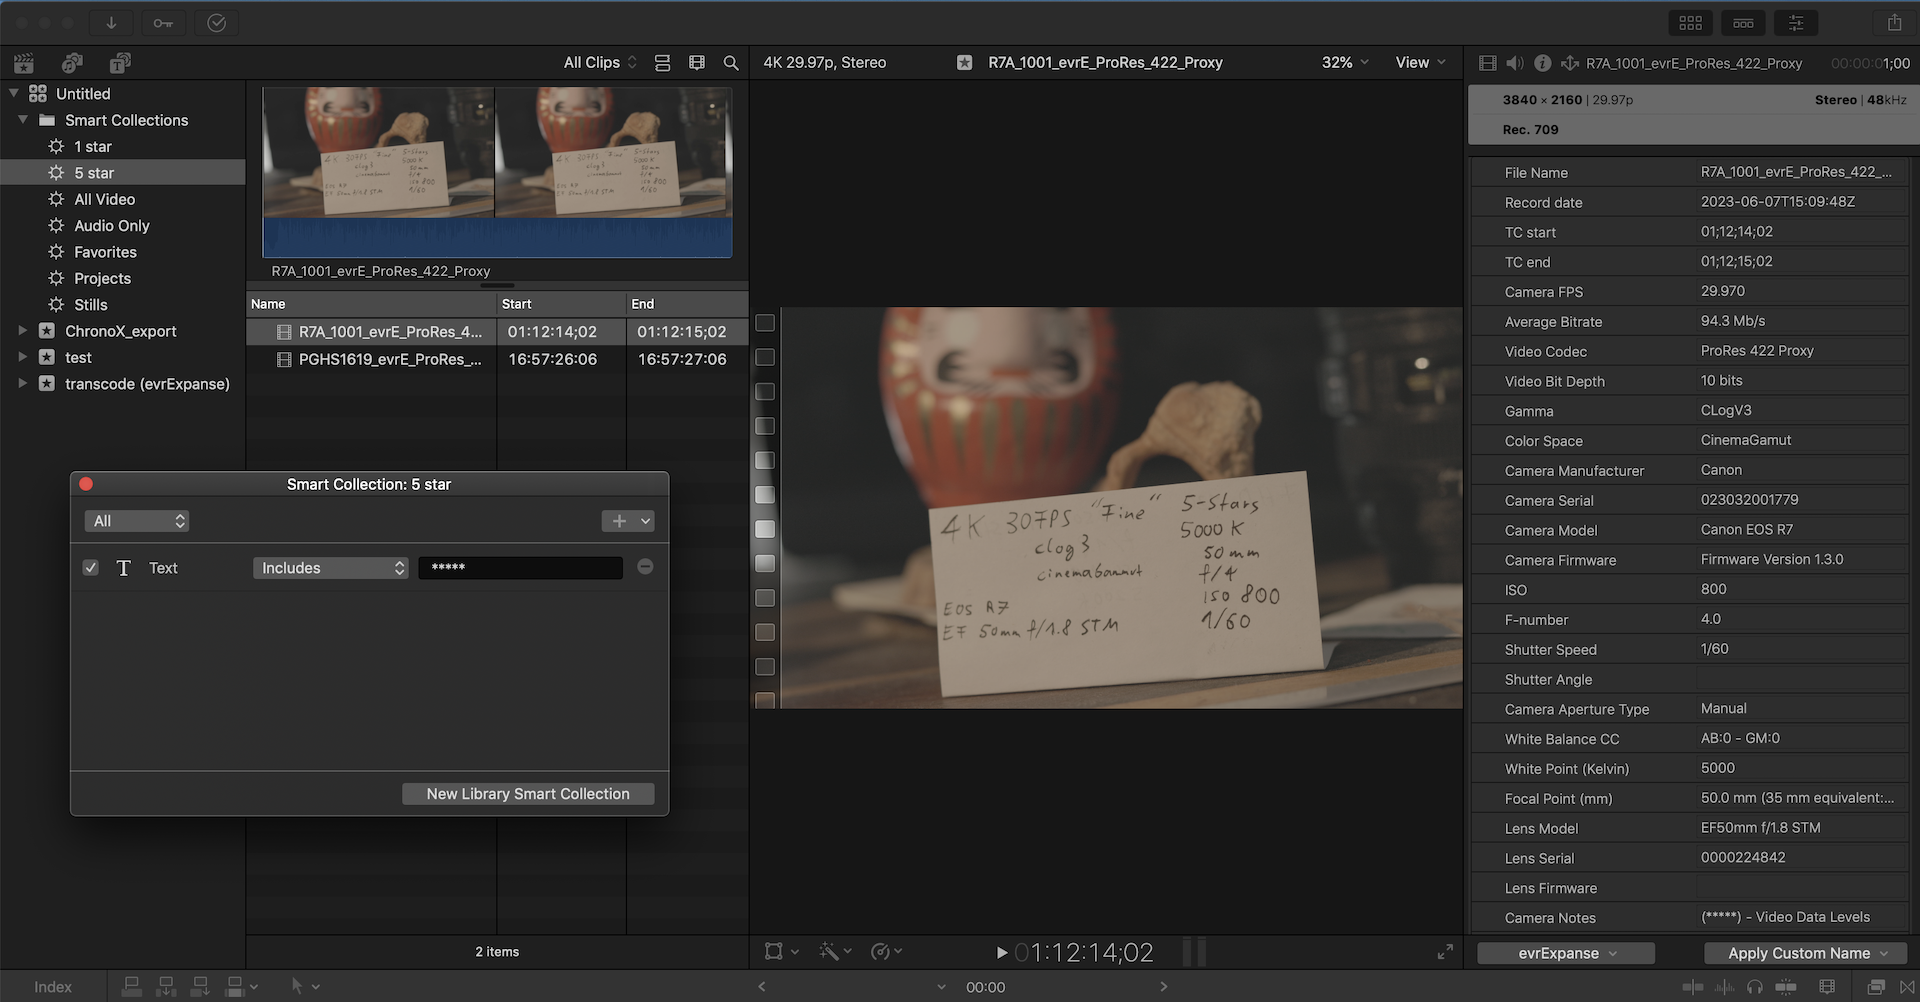
If you want to define criteria to create a Smart Collection of files with a one-star rating:
Add ( Text > includes > ) + ( Text > Does Not Include > )
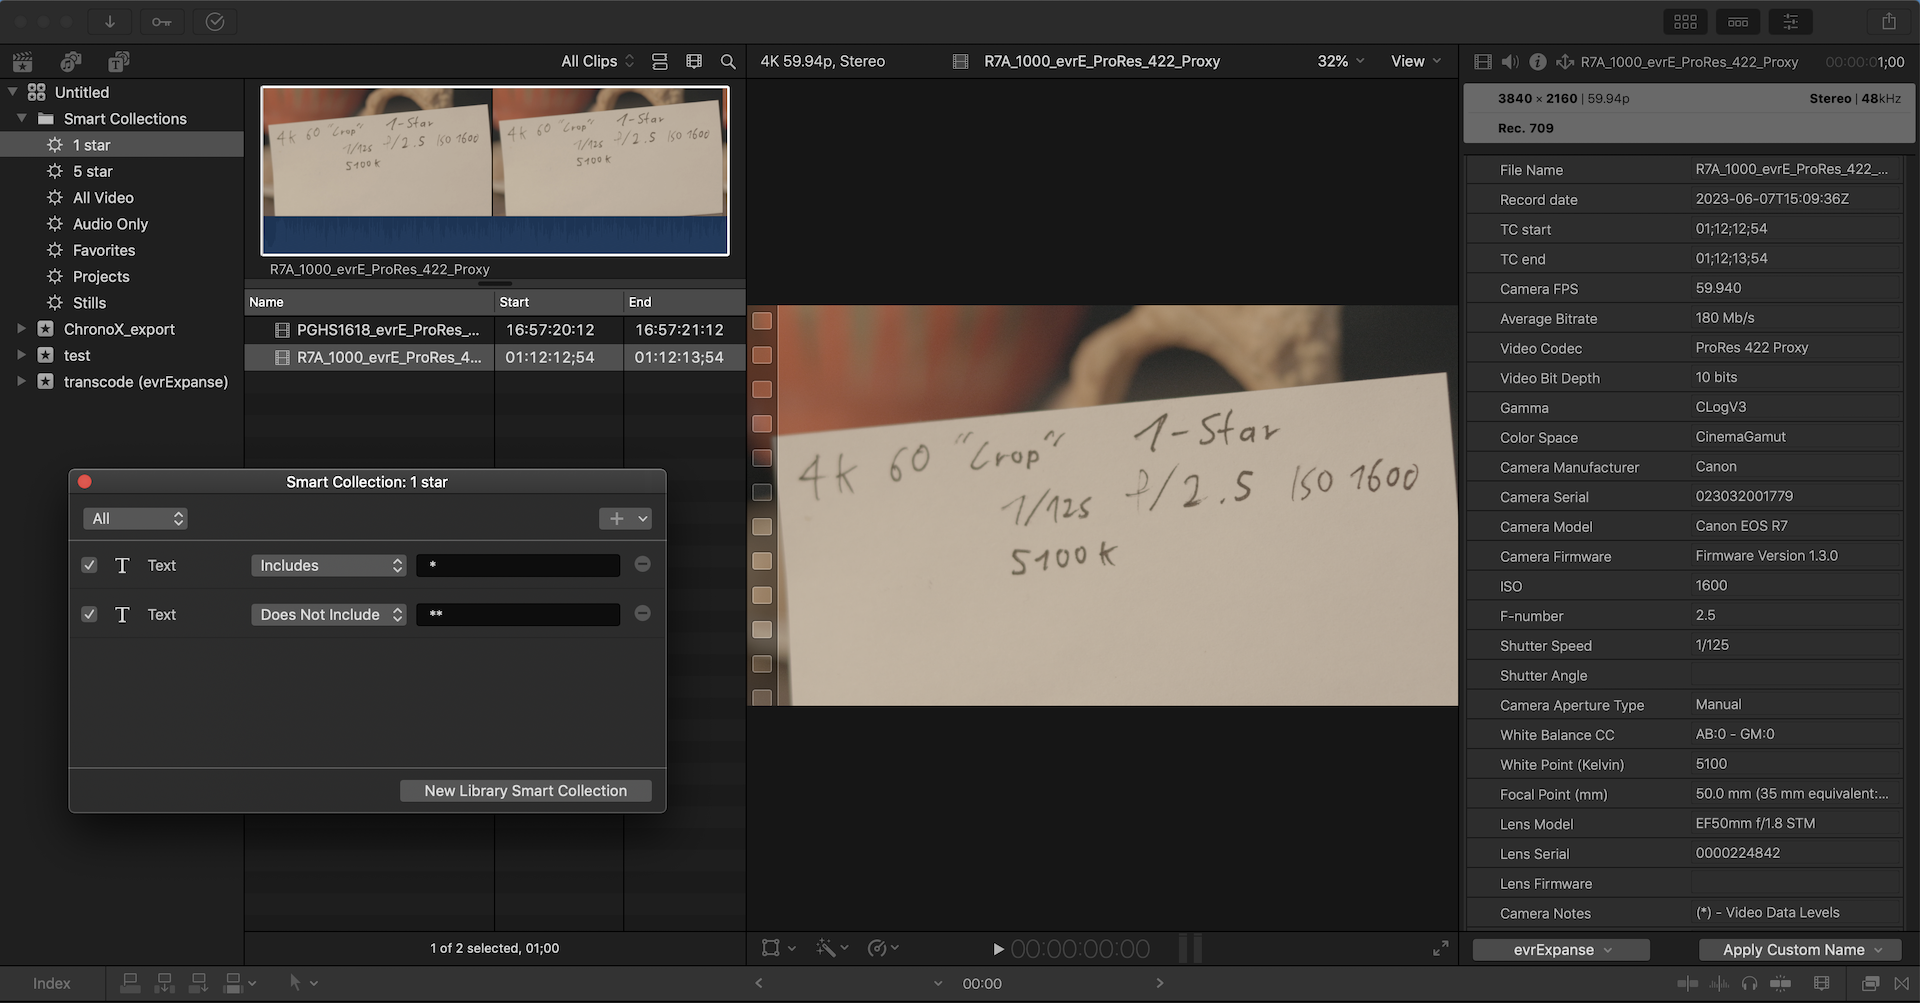
If you want to define criteria to create a Smart Collection of files with a 5-star rating:
Add ( Text > includes > )
Preview the results of your criteria in the "Matching clips" section to ensure it captures the desired clips.
Click "OK" to create the Smart Collection.
The newly created Smart Collection will now appear in the Smart Collections area of the Libraries sidebar, and it will automatically update based on the defined criteria as you import or modify media in your library.
Conclusion
Rating Metadata plays a crucial role in elevating video workflows by providing subjective video quality assessments that aid in collaboration, decision-making, and project management. With evrDVR and evrExpanse, professionals can effectively manage and leverage Rating Metadata. These software solutions extract, incorporate, and export Metadata, allowing seamless integration with NLE software. evrExpanse also facilitate the retention and embedding of Metadata during transcoding, ensuring metadata continuity. By exploring the capabilities of evrDVR and evrExpanse, users can unlock the transformative power of Metadata, enhancing their video production processes and achieving exceptional visual results.
By harnessing the power of Rating Metadata and leveraging the features of evrDVR and evrExpanse, videographers and filmmakers can streamline their workflows, improve collaboration, and achieve outstanding results in their video projects.